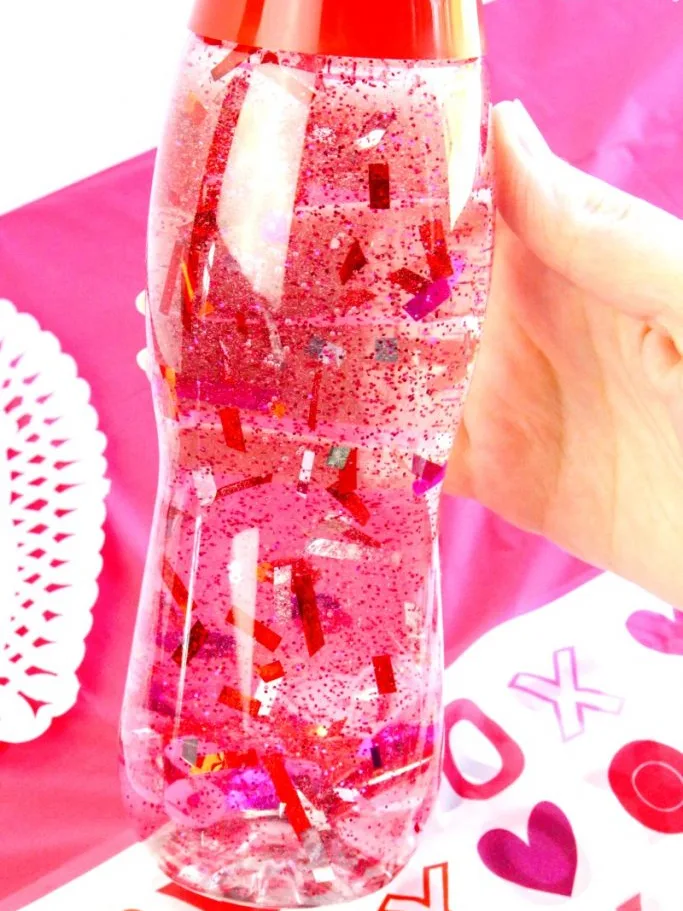
Valentine’s Day is a special time to celebrate love and affection, and what better way to engage children in the festivities than through sensory play? Sensory bottles are a fantastic tool for children to explore their senses, express their emotions, and engage in calming activities. In this article, we will delve into the world of Valentine sensory bottles and guide you on how to create your own.
Sensory bottles, also known as calm-down bottles or discovery bottles, are clear plastic bottles filled with a variety of materials that stimulate the senses. They are not only visually appealing but also provide a safe and non-verbal outlet for children to communicate and understand their emotions. By interacting with sensory bottles, children can learn to identify, process, and regulate their feelings in a calm and constructive way.
To create a Valentine sensory bottle, you will need an empty bottle with a secure lid. You can use an empty Voss Water or Core Water bottle, or you can find sensory bottles specifically designed for this purpose. Once you have your bottle, follow these simple steps:
1. Start by filling the bottle halfway with water. This will serve as the base of your sensory bottle.
2. Add about 1/2 cup of clear glue to the water. The glue will create a thicker consistency and help the glitter and other materials to suspend in the bottle.
3. Now, it’s time to add some color! Add a few drops of red watercolor or food coloring to the mixture. This will give your sensory bottle a vibrant Valentine’s Day theme.
4. Next, sprinkle in some red fine glitter. The glitter will create a mesmerizing effect as it floats and swirls around in the bottle.
5. To enhance the Valentine’s Day theme, consider adding some Valentine sequins or table scatter. These small decorative pieces will add an extra touch of sparkle and visual interest to the sensory bottle.
6. fill the rest of the bottle with water, leaving about 1/2 inch of space at the top. This space is necessary to allow room for shaking and movement within the bottle.
7. To ensure that the sensory bottle remains sealed and secure, use hot glue or superglue to seal the lid. This will prevent any leaks or spills during play.
Once your Valentine sensory bottle is complete, it’s time to let the sensory exploration begin! Encourage children to shake the bottle gently and observe as the glitter swirls and the sequins dance in the water. This visual stimulation can be incredibly calming and engaging for children.
In addition to the visual aspect, sensory bottles also provide tactile and auditory stimulation. Children can feel the smooth texture of the bottle, listen to the sound of the liquid and materials inside, and even experiment with different shaking rhythms to create unique sensory experiences.
Valentine sensory bottles can be used in various ways. They can be a calming tool for children who need a moment to relax and refocus. They can also be used as a visual aid to teach children about emotions and feelings associated with love and affection. Parents and educators can engage children in conversations about the colors, shapes, and movements they observe in the sensory bottle, fostering language development and cognitive skills.
Valentine sensory bottles are a wonderful sensory play activity for children during the season of love. They provide a safe and engaging way for children to explore their senses, express their emotions, and engage in calming activities. By following a few simple steps, you can create your own Valentine sensory bottle and embark on a sensory adventure with your little ones. So, gather your materials, unleash your creativity, and let the sensory exploration begin!

How to Make Valentine Sensory Bottles?
To make Valentine sensory bottles, follow these steps:
1. Get an empty bottle: Start by finding an empty bottle that is clear and has a secure lid. A plastic water bottle or an empty sensory bottle from a craft store would work well.
2. Fill halfway with water: Fill the bottle halfway with water. This will serve as the base for your sensory bottle.
3. Add clear glue: Add about 1/2 cup of clear glue to the bottle. This will help create a thicker consistency and make the contents of the bottle move more slowly.
4. Add red fine glitter: Sprinkle in red fine glitter to add a sparkling effect to your sensory bottle. The amount of glitter can vary depending on personal preference, but a tablespoon or two should be sufficient.
5. Add red watercolor: Add a few drops of red watercolor to give the water a vibrant red color. This will enhance the Valentine’s theme of the sensory bottle. Adjust the amount of watercolor based on the desired intensity of the color.
6. Add Valentine’s sequins or table scatter: Sprinkle in some Valentine’s themed sequins or table scatter. This will add visual interest and create a festive atmosphere within the sensory bottle.
7. Fill to the top with water: Fill the bottle to the top with water, leaving about 1/2 inch of space at the top. This will allow room for the contents to move and create the desired sensory effect when the bottle is shaken.
8. Secure the lid: To prevent any leaks or spillage, use hot glue or superglue to secure the lid of the bottle. Make sure it is tightly sealed to avoid any accidents.
Once the lid is secure, your Valentine sensory bottle is ready to be enjoyed! Shake the bottle and watch as the glitter, sequins, and watercolor create a mesmerizing sensory experience. This sensory bottle can be a fun and calming activity for children and adults alike.
What Liquid Do You Put in a Sensory Bottle?
When making a sensory bottle, the liquid you put in it is an essential component that helps create the desired sensory experience. While there are various options to choose from, two popular choices for sensory bottles are water and oil.
1. Water:
– Fill an empty water bottle about one-third full with water.
– Adding a few drops of food coloring to the water can enhance the visual appeal and make the sensory bottle more engaging.
– The color will disperse throughout the water, creating an interesting visual effect.
– You can experiment with different colors or even mix them to create a vibrant sensory display.
– Once you are satisfied with the colored water, proceed to the next step.
2. Oil:
– Fill the remaining two-thirds of the bottle with baby oil or cooking oil.
– Baby oil is a commonly used option due to its clear and transparent nature, while cooking oil can also work.
– The oil will float on top of the water, creating a separation between the two liquids.
– This separation allows for the formation of waves or other mesmerizing movements when the sensory bottle is shaken or tilted.
– The slow movement of oil adds a calming and soothing element to the sensory experience.
– Ensure that the bottle is properly sealed to avoid any leakage.
By using a combination of colored water and oil, you can create a visually stimulating and calming sensory bottle. The movement of the liquids and the interaction between them provide an engaging and relaxing experience for individuals of all ages.
How Do You Make Emotion Sensory Bottles?
To create emotion sensory bottles, you will need the following materials:
– Empty water bottles (Voss Water or Core Water bottles work well, but you can use any clear plastic bottle)
– Glitter glue (choose your favorite colors)
– Small objects or toys related to different emotions (e.g., happy face stickers, sad face stickers, small figurines depicting different emotions)
– Water
Here is a step-by-step guide on how to make emotion sensory bottles:
1. Start by collecting your empty water bottles. Make sure they are clean and dry before you begin.
2. Open the bottles and squeeze a generous amount of glitter glue into each bottle. The glitter glue will create a mesmerizing effect when the bottle is shaken.
3. Next, choose a theme for each sensory bottle based on different emotions. For example, you can have a bottle representing happiness, another for sadness, and so on. This will help children identify and explore various emotions.
4. Now, add the small objects or toys related to each emotion into their respective bottles. For the happiness bottle, you can add happy face stickers or small figurines depicting joyful characters. For the sadness bottle, you can include sad face stickers or figurines representing characters experiencing sadness.
5. Once you have added the glitter glue and objects, fill the remaining space in each bottle with water. Make sure to leave a small gap at the top to allow for movement when the bottle is shaken.
6. Securely close the bottles with their lids to prevent any leaks or spills.
7. give the bottles a good shake and observe the mesmerizing glitter swirls and the objects floating in the water. Encourage children to identify and discuss the different emotions represented by each bottle.
These emotion sensory bottles can be a great tool for children to explore and understand their feelings. They can also be used as a calming sensory activity or as a visual aid during discussions about emotions.
Conclusion
Valentine sensory bottles are a fantastic sensory tool that can be used to engage and calm children. These bottles provide a visually stimulating and interactive experience that can help children regulate their emotions and understand their feelings in a safe and non-verbal way.
By using different materials such as glitter, sequins, and watercolor, Valentine sensory bottles create a mesmerizing visual effect that captures children’s attention and encourages exploration. The addition of red fine glitter and drops of red watercolor creates a romantic and festive atmosphere, perfect for Valentine’s Day.
Moreover, the process of making these sensory bottles can be a fun and creative activity for both children and adults. It allows for personalization and customization, as different materials and colors can be used to match individual preferences. This not only enhances the sensory experience but also promotes a sense of ownership and pride in the finished product.
Furthermore, the use of sensory bottles can have significant benefits for children’s emotional development. By engaging with these bottles, children can learn to identify and process their emotions in a calm and constructive manner. The bottles provide a safe outlet for self-expression and communication, allowing children to express their feelings without the need for words.
Valentine sensory bottles are a valuable tool for promoting emotional regulation and understanding in children. Their visually stimulating and interactive nature, combined with the opportunity for personalization, make them a fun and effective way to engage children in sensory play. By incorporating these bottles into activities and daily routines, parents and educators can support children’s emotional well-being and help them develop important life skills.
