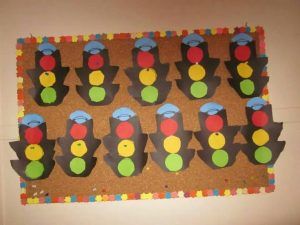
Craft activities are not only a great way to keep preschoolers engaged and entertained, but they also provide valuable learning opportunities. One such activity that combines creativity and education is making a traffic light craft. This simple project allows children to learn about traffic lights while also developing their fine motor skills. In this article, we will guide you through the process of creating a fun and interactive traffic light craft for preschoolers.
Materials Needed:
– Black construction paper
– Red, yellow, and green construction paper
– Cardboard tube
– Craft glue or hot glue gun
– Scissors
– Paint (red, yellow, and green)
– Paintbrush
Step 1: Prepare the Background
Start by cutting a large rectangle out of the black construction paper. You can adjust the size based on your preference, but a 6″ wide by 10″ long rectangle works well. This will serve as the background for your traffic light craft.
Step 2: Create the Traffic Light Circles
Trace circles on the red, yellow, and green construction paper using a jar lid or any other circular object. Cut out each circle carefully. Make sure the red circle is larger than the yellow, and the yellow is larger than the green. This will mimic the actual traffic light sequence.
Step 3: Build the Traffic Light
Take three short sections of the cardboard tube and glue them onto the black construction paper in a traffic light formation. The red section should be on top, followed by the yellow in the middle, and the green at the bottom. Use craft glue or a hot glue gun to secure the cardboard tube pieces in place.
Step 4: Paint the Traffic Light Circles
Pour out some red, yellow, and green paint onto separate palettes or plates. Give each child a paintbrush and guide them to paint each circle with the corresponding color. This step allows preschoolers to develop their fine motor skills while also learning about the colors associated with traffic lights.
Step 5: Assemble the Traffic Light Craft
Once the paint is dry, glue the painted circles onto the black construction paper. Start with the red circle on top, followed by the yellow in the middle, and the green at the bottom. Make sure to align them in the correct order to resemble a real traffic light.
Step 6: Learning and Playtime
Now that the traffic light craft is complete, it’s time to engage preschoolers in some educational play. Explain the meaning of each color on the traffic light and their corresponding actions. For example, red means “stop,” yellow means “slow down,” and green means “go.” Encourage children to practice following these instructions by playing a game of “red light, green light.”
This craft not only provides an opportunity for creativity but also helps preschoolers understand the importance of traffic lights and road safety. It is a hands-on activity that engages children’s minds while they have fun. Additionally, the craft can be used as a visual aid to reinforce traffic light knowledge in a playful manner.
The traffic light craft for preschoolers is a simple and enjoyable activity that combines creativity, fine motor skills development, and learning about traffic lights. By following the step-by-step instructions, you can create a fun and educational craft that will keep preschoolers engaged and provide a valuable learning experience.

What is the Traffic Light Game for Preschoolers?
The traffic light game for preschoolers is a fun and engaging activity designed to promote physical activity and listening skills. It is a simple game where children are given instructions based on the colors of a traffic light.
When the person in charge shouts “green light,” the children are allowed to run towards them as fast as they can. This simulates the green light on a traffic signal, indicating that it is safe to proceed. The objective for the children is to reach the finish line as quickly as possible.
However, when the person in charge shouts “red light,” the children must immediately stop and freeze in their tracks. This represents the red light on a traffic signal, indicating that it is not safe to proceed. Any child caught moving after the command to stop must go back to the starting line and begin again.
The game continues with alternating commands of “green light” and “red light” until all the children have successfully crossed the finish line. The winner is the child who reaches the finish line first.
The traffic light game not only provides a fun and energetic experience for preschoolers, but it also helps develop their listening skills and ability to follow instructions. It encourages them to pay attention to the commands given and react accordingly, enhancing their cognitive abilities.
The traffic light game is a popular choice for preschoolers as it combines physical activity, listening skills, and a sense of competition, making it an enjoyable and educational activity for young children.
How to Make a Traffic Light for Preschoolers?
To create a traffic light craft for preschoolers, you will need the following materials:
– Black construction paper
– Red, yellow, and green paint
– Paintbrushes
– Glue
Here are the step-by-step instructions to make a handprint traffic light:
1. Start by preparing your workspace. Lay out the black construction paper as the background for your craft.
2. Take the red paint and apply it evenly on one hand. Make sure to cover the entire surface of your hand.
3. Carefully press your hand onto the black construction paper to create a red handprint. This will represent the top light of the traffic light.
4. Rinse off the red paint from your hand and dry it thoroughly.
5. Repeat the process, but this time use yellow paint to create a yellow handprint beneath the red one. This will represent the middle light of the traffic light.
6. Once again, rinse off the yellow paint and dry your hand.
7. Lastly, apply green paint to your hand and create a green handprint beneath the yellow one. This will represent the bottom light of the traffic light.
8. Allow the paint handprints to dry completely.
9. Once the paint is dry, brush glue on the back of each handprint to secure them to the black construction paper. Make sure to arrange them in the order of a traffic light, with red on top, followed by yellow, and then green.
10. Press each handprint firmly onto the black paper, ensuring they adhere well.
11. Allow the glue to dry completely before displaying your handprint traffic light craft.
By following these steps, you will create a fun and educational traffic light craft that preschoolers can enjoy. This activity not only promotes creativity but also helps children learn about road safety and the meaning of different traffic light colors.
How Do You Make a Stoplight Craft?
To make a stoplight craft using a cardboard tube, follow these steps:
Materials needed:
– Cardboard tube
– Craft glue or hot glue gun
– Red, yellow, and green paints
– Paintbrushes
Instructions:
1. Start by cutting three short sections off the cardboard tube. These sections will serve as the different lights on the traffic light.
2. Using craft glue or a hot glue gun, attach the short sections of the cardboard tube onto a piece of cardboard in the shape of a traffic light. You can arrange them vertically, with the red light on top, followed by the yellow light, and then the green light at the bottom. Make sure they are securely glued in place.
3. Next, pour out some red, yellow, and green paints onto a palette or any suitable surface.
4. Take a paintbrush and begin painting each of the cardboard tube sections with their respective colors. Paint the top section red, the middle section yellow, and the bottom section green. Apply multiple coats if necessary, allowing each coat to dry before applying the next one.
5. Once the paint is dry, your cardboard tube traffic stoplight craft is complete!
Tips:
– You can add extra details to your stoplight craft, such as drawing black borders around each colored section to make it look more realistic.
– To make the craft sturdier, you can also glue the cardboard onto a thicker piece of cardboard or a small wooden base.
– If you don’t have a cardboard tube, you can use other materials such as paper towel rolls or plastic bottles cut to the desired length.
Remember to exercise caution when using hot glue guns and handle them with care to avoid any accidents.
How Do You Make a Traffic Light for Kids Project?
To create a traffic light project for kids, you will need the following materials:
– Black construction paper
– Red construction paper
– Yellow construction paper
– Green construction paper
– Scissors
– Glue
Here are the step-by-step instructions:
1. Begin by cutting a large rectangle out of the black construction paper. You can make it any size you prefer, but for this example, let’s make it 6 inches wide by 10 inches long.
2. Take the jar lid and trace a circle on the red construction paper. Cut out the red circle.
3. Repeat the same process with the yellow construction paper, tracing the lid and cutting out the yellow circle.
4. Lastly, trace the lid on the green construction paper and cut out the green circle.
5. Now, it’s time to assemble the traffic light. Take the black rectangle and apply glue to the back of the red circle. Place it at the top of the rectangle.
6. Next, apply glue to the back of the yellow circle and position it in the middle of the rectangle, just below the red circle.
7. apply glue to the back of the green circle and place it at the bottom of the rectangle.
8. Allow the glue to dry completely.
And there you have it! A simple and fun traffic light project for kids. The black rectangle represents the traffic light pole, while the red, yellow, and green circles represent the different signals. This project can be a great educational tool for teaching kids about road safety and traffic signals.
Conclusion
The traffic light craft preschool activity is a fun and educational way to teach young children about road safety and following instructions. By incorporating the game of “red light, green light” into the craft, children are engaged and excited to participate.
The construction paper traffic light visual serves as a visual aid to reinforce the concept of the different colors and their meanings. The use of handprints adds a personal touch and allows the children to feel a sense of ownership over their creation.
Not only does this activity promote creativity and fine motor skills through cutting and painting, but it also encourages listening and following directions. The game aspect of the activity adds an element of excitement and competition, motivating children to move quickly and make decisions based on the traffic light signals.
The traffic light craft preschool activity is an effective way to teach children about road safety while allowing them to have fun and be creative. It provides a hands-on learning experience that is both engaging and memorable. By incorporating play and art, children will not only understand the concept of traffic lights but also develop important cognitive and physical skills.
